If you’ve been searching for ways to upgrade your beauty routine with less damage, less guesswork, and better results, you’re in the right place. This article is designed to give you exactly what you’re looking for: practical beauty trends, proven techniques, and everyday hacks that actually fit into real life.
From skincare regimen insights that simplify your glow-up to makeup inspirations you can recreate without a professional kit, we break down what’s trending and what truly works. You’ll also discover heatless hairstyling methods that protect your strands while delivering effortless style, plus expert-backed tips to help you avoid common beauty mistakes.
Our content is built on in-depth trend research, insights from experienced beauty professionals, and careful analysis of what’s gaining real traction—not just social media hype. Whether you want to refresh your routine or master a specific technique, this guide gives you clear, trustworthy direction so you can look and feel your best every day.
My Go-To Trick for Damage-Free Curls
A few years ago, after frying my hair before a wedding, I swore off curling irons for good. Instead, I started experimenting with heatless hairstyling methods, and honestly, my hair has never looked better.
First, start with slightly damp hair and apply a lightweight mousse (trust me, it matters). Then braid for loose waves or wrap sections around a silk robe belt for bouncier curls.
Meanwhile, let it set overnight. By morning, you’ll have defined texture without the frizz, split ends, or regret. Your strands stay healthier, shinier, and far more resilient over time.
The Foundation: Prepping Your Hair for Lasting Heatless Styles
By embracing heatless hairstyling techniques, you not only promote healthier locks but also set the stage for effortlessly gorgeous looks on special occasions, like your wedding day—an event you’ll want to celebrate properly, as discussed in our article on Nitkafacts – for more details, check out our How To Celebrate Your Wedding Properly Nitkafacts.
First, start with damp—not wet—hair. Aim for about 80% dry. If strands are dripping, they’ll take forever to set and may dry unevenly (hello, surprise frizz). Some argue wetter hair locks in a stronger curl. In theory, yes. In practice, it often leads to limp roots and crunchy ends. Slightly damp hair gives you definition without the drama.
Next comes the product cocktail. Think of it as layering for longevity:
- Lightweight mousse for flexible hold
- Texturizing spray for grip and volume
- Leave-in conditioner for softness and frizz control
Detangle thoroughly with a wide-tooth comb—non-negotiable. A smooth canvas ensures uniform curl patterns and prevents snags.
Finally, section for success. Thicker hair needs smaller sections; looser waves call for larger ones. While some skip this step to save time, sectioning creates consistency worthy of heatless hairstyling methods (and far fewer “why is this piece straight?” moments).
Technique 1: Classic Braids for Effortless Beach Waves
Have you ever wondered why braids create that perfectly UNDONE, beachy texture by morning? It’s simple physics: as hair dries in a woven pattern, it sets into soft bends. This technique is best for medium to long hair and works beautifully with heatless hairstyling methods.
Step-by-Step Guide
Start with slightly damp hair. Create a center or side part—your choice shapes the final look. Divide hair evenly and braid from just below the ears if you want relaxed movement.
Braid Type Matters
- A classic three-strand braid gives you loose S-waves (think effortless surfer vibes).
- A French braid starts higher on the scalp, so waves begin near the roots for extra volume.
Which vibe are you going for—subtle ripples or full mermaid energy?
Pro Tip for Ends
Don’t leave the ends hanging straight. Tuck them into the elastic before securing. This helps the tips curve instead of staying pin-straight (the dead giveaway of rushed styling).
The Reveal
Once fully dry, gently undo the braids. Use your fingers—not a brush—to separate waves for a soft finish. Want more texture? Flip your head upside down and shake lightly. Effortless, right?
Technique 2: The Headband Method for Soft, Bouncy Curls
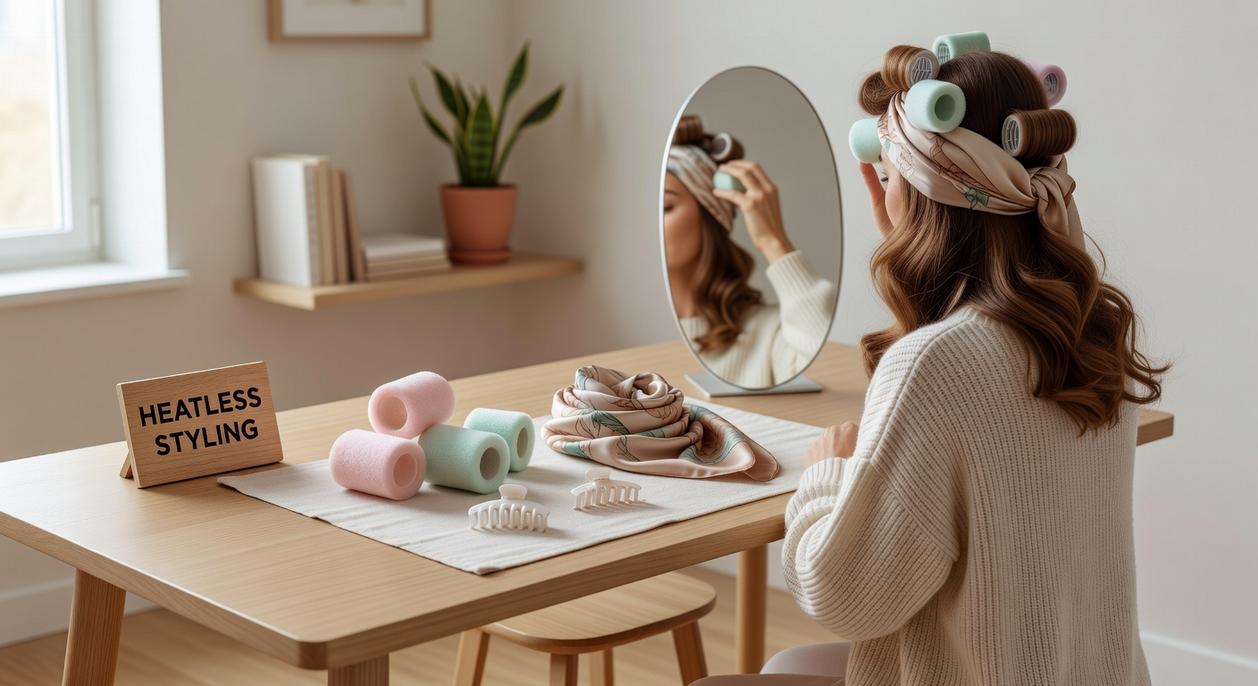
Best for shoulder-length cuts—think collarbone-grazing lobs popular in salons from SoHo to Shoreditch—the headband method creates uniform, bouncy curls without heat damage.
Step-by-Step Guide: Place a soft, stretchy headband over the crown like a halo, letting it sit snugly but not tight (you should forget it’s there after a minute).
The Wrapping Process: Starting near your temple, take a small section of hair and loop it up and over the band, then tuck it through. Keep adding sections, weaving them around the headband until all strands are secured. This is one of the simplest heatless hairstyling methods for defined waves.
Tension Is Key: Maintain consistent, firm tension as you wrap. Too loose and the curls fall flat; too tight and you’ll feel like you’re auditioning for a period drama. Balanced tension helps the hydrogen bonds in damp hair reset overnight (American Academy of Dermatology).
Some argue curling irons are faster. True—but they compromise long-term hair health.
Overnight Success: Sleep on a silk pillowcase, then gently unwind in the morning for a cascade of curls. Finish with serum—similar to techniques in how to achieve the perfect glass skin look at home—for definition.
Technique 3: Pin Curls for Vintage Glamour and Tight Ringlets
The first time I tried pin curls, I was getting ready for a 1940s-themed party and wanted Veronica Lake waves without a curling iron. I ended up obsessed. Pin curls are small, flat coils created from 1-inch sections of hair, each wrapped into a spiral and secured against the scalp to set into defined ringlets.
Best For: All hair lengths seeking defined, vintage-style ringlets or a strong curl base.
Step-by-Step Guide
Start with slightly damp hair. Take a 1-inch section, wrap it around your finger into a neat coil (think cinnamon roll), then lay it flat against your scalp.
Securing the Curl
Slide a bobby pin or duckbill clip across the coil, anchoring it without denting the curve. The goal is FLAT and firm, not tight and crimped.
Directional Styling
Alternate each coil’s direction—clockwise, then counterclockwise—for a softer, modern finish (unless you want full Old Hollywood drama).
Finishing the Style
Once fully dry completely, remove pins gently. Separate curls with fingers and mist a light-hold hairspray. Use heatless hairstyling methods for healthier strands.
• Pro tip: Smaller sections create tighter ringlets.
• Sleep on a satin scarf to reduce frizz.
Troubleshooting Common Heatless Styling Issues
Even the best heatless hairstyling methods can go sideways. Here’s exactly how to fix the most common problems.
Problem: Frizz and Flyaways
Frizz happens when the hair cuticle (the outer protective layer) lifts and pulls in moisture. Apply an anti-frizz serum to damp hair before styling to seal it. Then wrap your hair in a silk or satin scarf before bed—these smoother fabrics reduce friction compared to cotton (your pillowcase might be the real villain here).
Problem: Curls Fall Flat Quickly
If your curls collapse by lunchtime, prep with a stronger hold mousse or setting cream. Skip heavy hairspray—it weighs strands down. Instead, finish with a lightweight texturizing spray for grip and movement (think effortless, not helmet hair).
- Use products labeled “medium to strong hold.”
- Focus application at the roots for longevity.
Problem: Uneven or Kinked Results
Section hair evenly and wrap smoothly without twisting. Consistency is everything—precision beats speed every time.
Your journey to healthier, beautifully textured hair starts now. As of 2026, people are embracing heatless hairstyling methods after years of flat iron fatigue (remember the pin-straight craze of the 2010s?). By stepping away from heat, you’ve already reduced breakage and moisture loss—two causes of frizz and dullness (American Academy of Dermatology).
These techniques rely on time, tension, and smart prep—not scorching temperatures—to shape curls and waves. After three weeks, notice softer strands and definition.
Pro tip: set your style before bed and let hours do the work.
Explore more at beauty hub and choose one method to try tonight.
Effortless Beauty Starts with the Right Techniques
You came here looking for practical ways to elevate your beauty routine without adding stress, time, or damage—and now you have them. From smarter skincare habits to trend-forward makeup inspiration and heatless hairstyling methods, you’ve discovered how small, intentional changes can completely transform your everyday look.
The truth is, most beauty frustrations come from overcomplicating routines or relying on harsh techniques that don’t deliver lasting results. Whether it’s dull skin, damaged hair, or makeup that never quite sits right, the pain point is the same: you want effortless results without sacrificing health or time.
Now it’s your move.
Start applying these techniques today and simplify your routine with methods that actually work. Explore more expert-backed beauty insights, trending looks, and step-by-step hacks designed to make you look polished without the overwhelm. Join thousands of beauty enthusiasts who trust our proven tips to upgrade their routines—discover your next favorite technique now and see the difference for yourself.